
Thursday, November 19, 2015
Online Card Class Day 3--Classic and Elegant
Another card for my online class. Really enjoying all the new ideas I'm getting from this class. Here is my take on the Classic and Elegant card. It is a simple design using the Hero Arts Color Layering Christmas Tree. I trimmed the top panel to 3 3/4 by 5 1/2, and adhered a narrow gold ribbon to each side. The panel was attached with foam tape to the top folding card base. I will be attaching some red gems to the tree (as soon as I find them again)! If I can't find the gems, I may be using red stickles to give the tree a little more color!

Tuesday, November 10, 2015
Online Card Classes--Holiday Style Day One--Clean and Simple
Love the Online Card Classes I've taken so far, and this one is shaping up to be another.
The first class was clean and simple, and I liked the technique Julie used for her trees. While she made it a one layer card, I had the Tim Holtz Crazy Birds stamps with matching dies, and wanted to try them out.
I masked a snow hill on the bottom of the card front, then colored the sky with Simon Says Stamp steel blue ink, using a stipple brush to, I hope, look like a swirling snowy sky. I then stamped a tree (from Hero Arts Sending Holiday Cheer stamp set) several different times, using first and second generation stamping to get color variations. I was hoping to give the card the illusion of distance for some of the trees.
After stamping, coloring, and die stamping a bird, I stamped and colored a Santa hat and candy cane, also from Tim Holtz. Since I don't have the dies for this set (yet), I was forced to cut out by hand. I'm not good at this, and the die set is definitely going on my Christmas list!!
I glued the hat and candy cane to the bird, then glued it to the front of the card front I had made. I stamped the sentiment from Tim Holtz on the front, and used a sentiment from the Hero Arts stamp set--may your home be filled with the joys of the season--for the inside. The sentiments were stamped in Momento Tuxedo Black.
The front was trimmed to 5 1/4 by 4 inches, and was then attached to the card front.

Tuesday, September 29, 2015
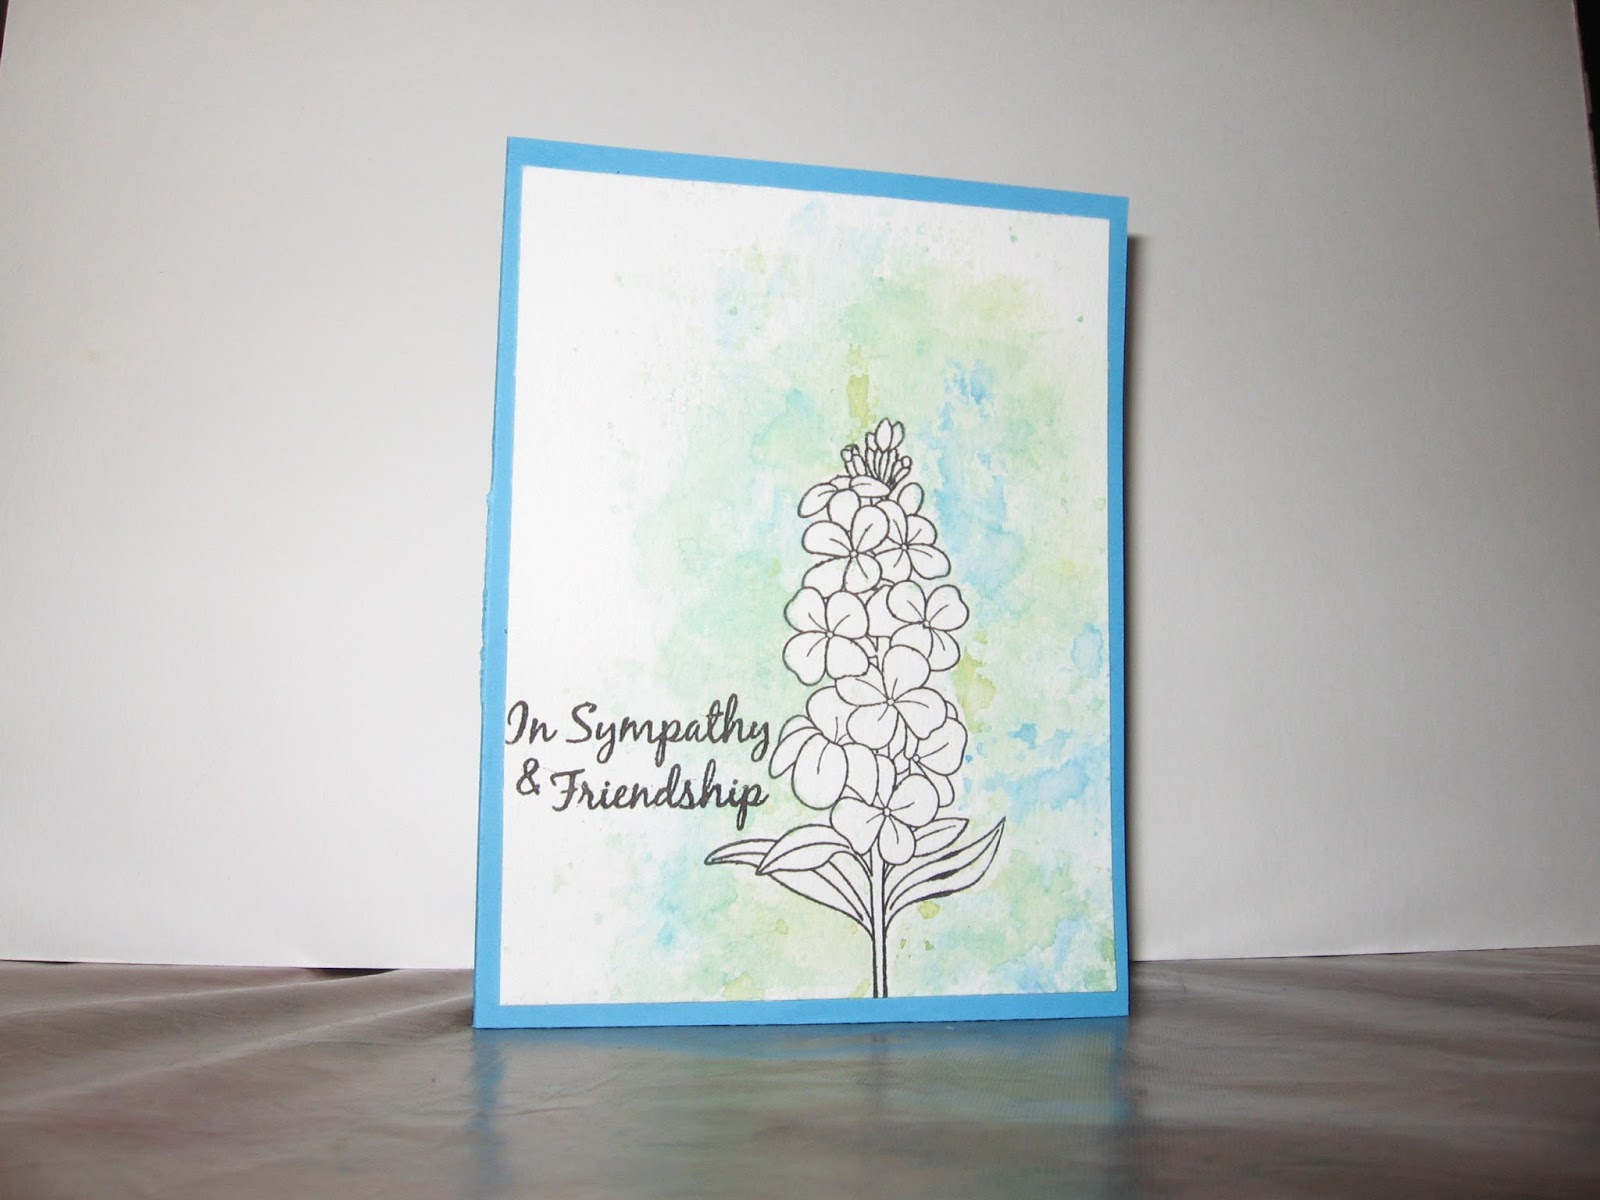
Watercolor Class Day 2--paints--One more card
I stamped a flower design I liked with VersaFine ink, and the sentiment. I then attempted to color in the flowers with my tube watercolor paints ( Winsor-Newton) using crimson. I diluted with water quite a bit to go over the flowers, and then when dried, went over again with a slightly less diluted paint of the same color to add some shading.

All in all, I think it came out fairly well. I've never used these tube paints before, and found them a little intimidating at first, but just pushed on, and I feel that the result is a lot better than I had envisioned!

All in all, I think it came out fairly well. I've never used these tube paints before, and found them a little intimidating at first, but just pushed on, and I feel that the result is a lot better than I had envisioned!
Monday, September 28, 2015
Another card colored with my watercolor pencils
This was based on one I'd see somewhere, I can't remember exactly where--perhaps on Pinterest, or on one of the Facebook pages I'm a member of. In any event, they had taken the snowman and made him into a wobbly card, which I thought was cool looking. As I wanted to do a little more with my InkTense pencils for my Watercolor for Cards class from Onlinecardclasses.com, I chose that medium to color my snowman.

I stamped the snowman on two pieces of watercolor paper, and colored both of them with my Derwnt InkTense pencils. I cut out the best looking one, attached a wobbly spring to the back, and added to my card front. It is really cute in real
life!

I stamped the snowman on two pieces of watercolor paper, and colored both of them with my Derwnt InkTense pencils. I cut out the best looking one, attached a wobbly spring to the back, and added to my card front. It is really cute in real
life!
Saturday, September 26, 2015
Another card with watercolor pencils
Using a few stamps from Peachy Keen Stamps' Lisa Jean Halloween set, I made a little Halloween scene with matching sentiment. After stamping with VersaMark, I embossed with Zing! Opaque Black embossing powder.
My watercolor paper warped some during the heating process, but I managed to mostly flatten it out again before attempting my water coloring. I used Derwent Inktense pencils, and tried to use a light touch, and it seemed to go okay.
I was attempting to do a little shading, and it was a little harder than I had hoped. The cauldron didn't come out exactly as I had pictured it, but I guess it isn't too bad. I thought the face turned out pretty well, but it doesn't show that much in the photo. In real life, you can see it is darker around the edges, and lighter in the middle.

Thursday, September 24, 2015
Online Card Class: Watercolor Day 2--paints
Went back and watched the Day 2 videos again, and decided to try the "dreamy" background. I used Prang Oval 16 semi-moist watercolors on Canson Watercolor paper.
 First I did a light yellow wash, and after it dried, I added some more yellow, let it dry, and then a third layer of yellow. I decided what the background needed now was a little orange, so that was next. When the orange was dry, I used the brush to flick a few yellow droplets on top, and then some orange droplets.
I stamped with black VersaFine Onyx Black a Tim Holtz saying, Be an Individual. I had to stamp it twice, and it it didn't make a great impression on the watercolor paper.
To finish it off, I matted it in yellow, and used foam tape to attach to the off white card base.
I was pretty happy with the way the background came out with the layers, and using the traditional paints wasn't as hard as I thought it would be.
Wednesday, September 23, 2015
Online Card Class--Watercolor Day 3 Watercolor Pencils
I didn't get a chance to watch the Day 2 videos until last night, so didn't do any water coloring yesterday. Today, the Day 3 videos were available, so I watched them this morning. As I had just received my Derwent Inktense ink pencils, I was eager to try them out, so I skipped the pan water colors for today. I'll be trying some of the techniques out for that tomorrow.
I had this idea to emboss some watercolor paper with a butterfly folder I had on hand by Darice, and then color in the design with the pencils before spritzing it with a light mist of water.

As it turned out, some of the colors bled into the background a little, and I had to use a brush to aid in the blending I had imagined.
I also wasn't happy with the blending on the largest butterfly, so I added a little more color and used water on a brush to blend it. All in all, after it dried I liked how it turned out.
I stamped a Thinking of You Sentiment from My Sentiments Exactly in Hero Arts Pool ink in the upper corner, matted it on avocado green card stock, and used foam tape to attach it to a cream colored card base.
It was pretty obvious to me that I need to practice quite a bit on my coloring with the pencils, as I don't seem to be using consistent pressure, causing some places to be darker than others.
I'll be doing some Day 2 cards with pan watercolors shortly, and probably some more watercolor pencil cards.
Tuesday, September 22, 2015
Another card from Day One
This was made from the second watercolor strips card I made on the first day of class, and I was hoping it would turn out a lot better than the first one I'd done, as I was using a better watercolor paper. However, I couldn't really see all that much difference, and so I was a little disappointed.

Looking at it, I thought I'd cut it down into a circle and stamp a flower on it. Using the Simon Says Stamp largest Stitched Circles die, I cut out a nicely colored section of the strips. I then used Onyx Black VersaFine Ink to stamp the flower stamp on the circle. I attached it to the center of a white A2 card base.
When I stamped the Thinking of You I tried to curve it a little to match the curve at the bottom of the circle die cut, without being too obvious about it. I think it turned out pretty well.
Monday, September 21, 2015
Another card from my Day One experiments

I took another of my first day experiments, which I didn't think turned out very well originally. By turning it upside down, I thought it looked like a beautiful sunset, so stamped some trees in Onyx Black Versafine Ink. I trimmed off some of the watercolor card where it had pilled before stamping, and then matted the card with black card stock.
I had to do quite a bit of touching up on the bottom of my stamping, where I apparently hadn't pushed down on the stamp enough, but I think it turned out pretty well.
I was going to make this into a sympathy card, but I'm not sure if it is a little too bright for that. I'm going to give it some thought. Maybe I'll make it a thinking of you or missing you card. The sentiment will go at the top, I think, although I left a little room on the bottom for a small sentiment if I want to go that way.
Card from Day One Watercolor Class

Using the first of my experiments from Day One of the class, I trimmed it down and stamped a sentiment from Stampers Anonymous Tim Holtz Phrases 2 with Onyx Black Versafine Ink.
I had to use a black micron pen to touch up a couple of places, but it actually stamped a lot better than I thought it would
I matted the sentiment with black card stock, and used foam tape to give it a little dimension on the white card base..
Even though the watercolor strips didn't turn out the way I had hoped, I think it turned into a pretty nice background.
Day One--last experiment
I decided to try the dots technique with my distress markers, and made several dots with peeled paint, squeezed lemonade, and tumbled glass. When I spritzed them, the peeled paint seem to take over the other colors, with the tumbled glass all but disappearing and the squeezed lemonade in the background after drying.
Since the distress ink can continue to react with water, I decided to add a few dots with worn lipstick, additional tumbled glass, and a little more squeezed lemonade. After I spritzed it again, the different colors were more noticeable, but I still thought they were a little less blended than I wanted when they dried.

My next move was to get a large brush, wet slightly with water, and run across the paper from the left side to the right several times going down the paper and blending the colors more. I rather like how it finally turned out, and think it will make an interesting background.
Class--Day One, Markers, continued.
I continued my experiment with the cheap markers I had. I used a yellow-green marker at the top, followed by a yellow marker, then an orange marker, and at the bottom a red marker. These markers did not have any type of brush tip, just the standard marker tip, although slightly rounded.
They reacted to the water similarly to the distress markers, although the yellow-green and yellow lost a lot of color when wet (and there was not much difference between these two when dry, either). The orange seemed to spread into them a bit from the water, and everything ended up with a orange-red color, the yellow barely noticeable, and the green not at all as a green color, but appears to be more of a yellow.

I also noted that the markers seemed to be rough on the paper, with some pilling at the top while trying to color the yellow-green and, to a lesser degree, the yellow. I hadn't noticed that with the distress markers.
Online Card Class: Watercolor for Cardmakers--Exploring Mediums Day One, Markers
Well, started another class from OnlineCardClass.com, about using different watercolor mediums. I've already taken the first Watercolor for Card makers class they offered, but felt I would learn even more with this class.
The first day explored watercolor markers. I have two sets of markers, my distress inks markers, and a cheap set that came in a set with other art supplies.

I started with the distress markers. I colored in strips of color on my watercolor paper (not a very good paper, I'm afraid, as it came with the set). I did strips of stormy sky at the top, followed by tumbled glass, shaded lilac and finally pickled raspberry. I then added water to blend the colors together. It turned out okay, but not what I'd call good. The pickled raspberry didn't blend as well as the other ones, even after I added extra water.

I decided to try the same thing again, only this time on Canson Watercolor paper, and see if that made a difference. Using the same colors and technique, I could see a slight difference in the two papers.

For my third try, I washed the Canson paper with water, then tried using the markers on the wet paper. The coverage was poor, with the two blues fading almost to no color except at the edges, even the lilac didn't make much of a showing. The pickled raspberry, on the other hand, was quite vibrant.
I really wasn't very impressed with any of these experiments with the markers, but will be trying these techniques with the other watercolor markers I have in my next post. Hopefully, they will turn out better.
Friday, August 28, 2015
SSS September Card Kit: Pastel Balloons

Using two designs from the 6x6 paper from the kit, I cut a 5.25 x 1 inch piece of the bow-tie design, and a 4.25 x 3.25 piece from the balloon design. I matted the balloons to a 4.25 x 3.5 piece of blue card stock from the kit. I used the same blue card stock cut 5.25 x 4 inches and adhered to the white card base. I then adhered the bow-tie strip to the right side of the card front. I popped up the matte piece with the balloons with foam tape before attaching to the right front. To finish off the card, I found some enamel hearts in my stash and scattered some across the front.
Thursday, August 27, 2015
SSS September Card Kit: Celebrate Birthday
I've made another card from the SSS September Card Kit, using another of the acetate sheets.
Cutting one of the 6x6 sheets included in the kit down to 5x3.75, I adhered it at an angle on my white card base. I then adhered the acetate sheet on top at a different angle, by running my tape runner just on the corners of the sheet. The tape doesn't appear to be noticeable, unless you know it is there and and are really looking for it.
To finish the card off, I stamped the let's celebrate from the SSS Birthday Bits stamp set included with the kit in Tuxedo Black Momento ink, and added several sequins to add a little bling.

The photo doesn't show the colors of the sequins very well--there are aqua, mustard, pink, and orange sequins scattered across the card front.
I think I'm going to continue making cards from this kit over the next few days, to see how many different ones I can come up with!
Another card from the SSS September Card Kit
Thought I'd try the gesso with the stencil that was included in the Simon Says Stamp kit. I didn't do real well with it, especially in the middle of the card stock strip I was putting it on. So...I covered up the middle with my sentiment. I think the card turned out pretty well, considering my mistakes!
I used the gesso and the stencil that was in the kit, and spread it on a 5.25x2.25 inch piece of the light green card stock I had left from my first card. After letting it air dry, I adhered it to my white card base. I then stamped the sentiment from the SSS Birthday Bits stamp set included in the kit, die cutting it with a Spellbinders distressed edges die. I outlined the sentiment with my Pigma micron pen in black, and attached the sentiment with foam tape to make it pop. I finished off the card by adding a few green and black sequins.

The photo doesn't do the sequins justice. The green sequins are a little brighter in the photo than in real life, and the two dark sequins are both black and are identical to each other.
Wednesday, August 26, 2015
SSS September Card kit finally arrived!
I've been getting the Simon Says Stamp Card Making Kit for several months now, and really love all the new ideas I've been getting. However, I've been a little lax on posting to my blog as my husband and I have been spending a lot of time camping this summer, and there is only Wi-fi at the office and clubhouse.
We're home for a few days, and my September 2015 Card Kit has arrived! I've already made my first card from the kit, and thought I'd show how it turned out!
The kit came with some acetate sheets in several colors, each with a different design on them. Never having worked with acetate sheets before, I decided to make a simple card using one.

I cut the green backing card stock (from the kit) at 5.25 inches by 4 inches, to leave a little of the white card base showing. I cut the wood grain with white triangles paper (one of the 6x6 papers included in the kit) slightly smaller than the green, and then attached one of the green acetate sheets with silver brads. I then attached the whole topper to the card base with foam tape to pop it up a little. Super simple card to make!
Thursday, May 28, 2015
Using liquid masking--Day 3
I've never tried liquid masking before, but I got out my rubber cement and an old paintbrush, and gave it a try. I first stamped the flower on the watercolor paper, and then attempted to paint over it with the rubber cement. Not as easy as you might think.
My first problem was the brush. While I thought it was quite a small brush, it was actually a little larger than it should have been, and I had a little trouble covering the flower without going too much out of the lines.
My second problem was the background. I decided to use my distress ink markers, scribbling them on an acrylic block, spritzing with water, smearing a little together with my finger, smooshing the block onto my paper. There was a little too much water on the block, I think, and when I lifted it to smoosh, it ran all over and didn't look as good as I had imagined it. I blotted the paper with a paper towel, then tried again, this time using fewer colors and a lot less water. This seemed to work better, and actually gave a little depth to the background.

I rubbed off the rubber cement when it was dry, and discovered I hadn't covered the stamping as well as I had thought, and there were little spots where the watercolor had gone through.
Overall, I think the project came out pretty well, and once again I have discovered several things I should not do the next time I attempt this, as well as a couple of things that I liked.
My first problem was the brush. While I thought it was quite a small brush, it was actually a little larger than it should have been, and I had a little trouble covering the flower without going too much out of the lines.
My second problem was the background. I decided to use my distress ink markers, scribbling them on an acrylic block, spritzing with water, smearing a little together with my finger, smooshing the block onto my paper. There was a little too much water on the block, I think, and when I lifted it to smoosh, it ran all over and didn't look as good as I had imagined it. I blotted the paper with a paper towel, then tried again, this time using fewer colors and a lot less water. This seemed to work better, and actually gave a little depth to the background.
I rubbed off the rubber cement when it was dry, and discovered I hadn't covered the stamping as well as I had thought, and there were little spots where the watercolor had gone through.
Overall, I think the project came out pretty well, and once again I have discovered several things I should not do the next time I attempt this, as well as a couple of things that I liked.
Wednesday, May 27, 2015
More masking paper lessons
Well, this didn't go as well as I had hoped. I die cut a hello from my masking paper, and then tried stamping with little tiny flowers and leaves in the negative area. Apparently, my hello was too small, and you couldn't tell there were flowers and leaves. It was more like green and blue blobs. Then, while removing the mask, I somehow managed to smear blue all over everything. That card took a quick trip to the waste basket, and I tried again with some little dots. That didn't work, as they didn't define the edges enough to see what the word was. That was it for the negative mask, it didn't survive the effort.
I then just put the positive die cut on the front of a card, then just used some Distress Inks to blend around it. That actually turned out fairly well.

I'm going to try this technique in the future with a larger die, like the distressed rectangle I used for day one, as soon as I get a little more time. I'm a little behind on homework for this class, and I want to try some of the other masking techniques before I go back to this one. I'm sure the next time will be much better, as I now know what "not" to do!
Tuesday, May 26, 2015
Maskerade Online Card class--Day One
Today's lesson was using masking tape and masking paper on your cards. My first card for this class included using both the positive and the negative from a sheet of masking paper that had been die-cut, as described in Debbie's video. I used a die from the Spellbinders A2 Distressed set.
After die cutting the masking paper, I used the negative (using the outside of the cutout) to mask off the card front. Using Hero Arts Field Greens ink, I inked the opening along the edges. I then added a little Distress ink Peeled Paint to add a little interest. I stamped the word congratulations in Momento Tuxedo Black, from My Sentiments Exactly Graduation Innies and Outies.
Before peeling off the mask, I inserted the cut out back in place. When I peeled off the outside mask, the inside (positive die cut) was in perfect position. This one tip alone was worth the class price!
Using WPlus9 Spring Blooms, I stamped several different flowers and leaves around the masked off area. When I peeled off the mask, I discovered that some of the mask stuck to the card, and spent several minutes carefully rubbing off the remaining mask residue.
 The card looked like it was missing something, so I stamped a couple of more flowers with Memories Mango ink, used the matching die to cut them out, and popped them up on the card with foam tape. I'm considering adding a few enamel dots to add a little something more, but haven't decided if that would just be too much, or just right. I'll give myself a couple of days to think it over.
After die cutting the masking paper, I used the negative (using the outside of the cutout) to mask off the card front. Using Hero Arts Field Greens ink, I inked the opening along the edges. I then added a little Distress ink Peeled Paint to add a little interest. I stamped the word congratulations in Momento Tuxedo Black, from My Sentiments Exactly Graduation Innies and Outies.
Before peeling off the mask, I inserted the cut out back in place. When I peeled off the outside mask, the inside (positive die cut) was in perfect position. This one tip alone was worth the class price!
Using WPlus9 Spring Blooms, I stamped several different flowers and leaves around the masked off area. When I peeled off the mask, I discovered that some of the mask stuck to the card, and spent several minutes carefully rubbing off the remaining mask residue.

Thursday, March 26, 2015
Day 6--Using Dies to make a shaped card


Here's my interpretation of a shaped card. I used a curvy border die on the edges of the card, and stamped the front with caution signs and traffic cones, coloring them in with Copic markers. I stamped a couple of construction machines, colored them with Copic markers, and cut them out with the matching dies to place on the inside. These were all from Taylored Expressions "Dig In" set, as was the Dig In stamp on the inside. The Happy Birthday on the inside was from the Inky Antics "Cupcake Birdy" set.
Sunday, March 22, 2015
Day 5-- Window Card

Using Shari's idea of the die cut window, I made a get well card. I also used her idea of placing the image behind the window, with adhesive on its back, to allow perfect placement!
The front is popped up, which doesn't really show very well in the photo, but it is really nice in real life. Very pleased with this card.
Cards from Day 2
I decided to try Yana's idea of using the negative image for my card front. I dug out the few floral dies I had, and laid them out on my card front.
I also thought I'd try to put the craft foam behind it first, and cut them both out at the same time. It sort of worked, but not very well. If I try it again, I will make the foam the same size as the front, or make more of an effort to keep the dies only on the parts of the front that has the foam behind it, as some of the dies were too close to the edge, and caused a few wrinkles in the card front.
After putting the image on the card base, I was not pleased at all. I then stamped through the die cuts with the matching stamps, which I liked better.
Looking at the die cuts I had left, I decided to use Kristina's idea from Day 4, and used them to make another card.

I really enjoyed trying out new ideas, and I'm sure I will do better the next time I make this kind of attempt!
I also thought I'd try to put the craft foam behind it first, and cut them both out at the same time. It sort of worked, but not very well. If I try it again, I will make the foam the same size as the front, or make more of an effort to keep the dies only on the parts of the front that has the foam behind it, as some of the dies were too close to the edge, and caused a few wrinkles in the card front.
After putting the image on the card base, I was not pleased at all. I then stamped through the die cuts with the matching stamps, which I liked better.
Looking at the die cuts I had left, I decided to use Kristina's idea from Day 4, and used them to make another card.
I really enjoyed trying out new ideas, and I'm sure I will do better the next time I make this kind of attempt!
Wednesday, March 18, 2015
Day 3, second card--Window Flaps

Another great idea for today's class--making a window flap to show the inside! I used a sentiment from Art Impressions Sound Off Jean set. I added some washi tape strips to add the color for the front.

On the inside, I added the figure that came from the set to add a little something to the card!
First card for Day 3--Fold out window

Lots of great ideas in today's class. The first video, by Jennifer, really inspired me!
I used a flower type die, and cut a window in the folded card fronts. I stamped a sentiment from Art Impressions Laughing Set on the front right.
On the inside I used the figure from that set, along with a sentiment from the Art Impressions Party Girls set. I think it turned out pretty nice. I had a few problems, but I don't think they're all that noticeable in the finished card. This is going to be a birthday card for a girlfriend I've had for over 55 years, and the sentiment describes us to a T!

Monday, March 16, 2015
Stretch Your Dies Online Card Class
First day of the online card class, and already some really great ideas. I particularly wanted to try the partial die cutting, so that is my first card.
I only have a couple of block type word dies, so used the "Thanks" die to make this card. I didn't want to stamp a background, so just used a red paper behind the die cut. There are a couple of mistakes, but all in all, I like how it came out.

I also want to try the die cutting of craft foam, but that will have to wait until I do some shopping!
I only have a couple of block type word dies, so used the "Thanks" die to make this card. I didn't want to stamp a background, so just used a red paper behind the die cut. There are a couple of mistakes, but all in all, I like how it came out.
I also want to try the die cutting of craft foam, but that will have to wait until I do some shopping!
Subscribe to:
Posts (Atom)